


SECTION 6
6-5 T-268-07
d. Evacuate and dehydr ate the unit. (Refer to section
6.5.)
e. Charge unit per section 6.6.
6.5 EVACUATION AND DEHYDRATION
6.5.1 General
Moisture is the deadly enemy of refrigeration systems.
The presence of moisture in a refrigeration system can
have many undesirable effects. The most common are
copper plating, acid sludge formation, “freezing-up” of
metering devices by free water, and formation of acids,
resulting in metal corrosion.
6.5.2 Preparation
a. Evacuate and dehydrate only after pressure leak
test. (Refer to section 6.4.)
b. Essential tools to properly evacuate and dehydrate
any system include a vacuum pump (8 m
3
/hr = 5
cfm volume displacement, P/N 07-00176-01) and
electronic vacuum gauge.
c. If possible, keep the ambient temperature above
15.6_C(60_F) to speed evaporation of moisture. If
the ambient temperature is lower than 15.6_C
(60_F), ice might form before moisture removal is
complete. Heat lamps or alternate sources of heat
may be used to raise the system t emperature.
d. Replace the filter-drier with a section of copper
tubingwith theappropriatefittings. This actionwill
help speed the evacuation procedure.
6.5.3 Procedure
a. Remove all refrigerant using a refrigerant recovery
system.
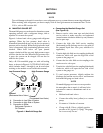
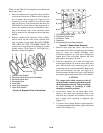
b. The recommended method to evacuate and
dehydrate the system is to connect three evacuation
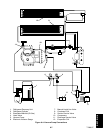
hoses, as shown in Figure 6-4, to the vacuum pump
and refrigeration unit. DO NOT use standard
service hoses, as they are not suited for evacuation
purposes. Also as shown, connect a evacuation
manifold, with evacuation hoses only, to the
vacuum pump, electronic vacuum gauge, and
refrigerant recovery system.
c. With the unit service valves closed (back seated)
and the vacuum pumpandelectronic vacuum gauge
valves open, start the pump and draw a deep
vacuum. Shut off the pump and check to see if t he
vacuum holds. This operation is to test the
evacuation setup for leaks. Repair if necessary.
d. Midseat the refrigerant system service valves.
e. Open the vacuum pump and electronic vacuum
gauge valves, i f they are not already open. Start the
vacuum pump. Evacuate unit until the electronic
vacuum gauge indicates 2000 microns. Close the
electronic vacuum gauge and vacuum pumpvalves.
Shut off the vacuum pump. Wait a few minutes to
be sure the vacuum holds.
f. Break the vacuum with clean dry refrigerant gas.
Use refrigerant specified for the unit. Raise system
pressure to approximately 2 psig, monitoring it
with the compound gauge.
g. Remove refrigerant using a refrigerant recovery
system.
h. Repeat steps (e) through (g) one time.
i. Remove the copper tubing and change the
filter-drier. Evacuateunit to 500 microns. C lose the
electronic vacuum gauge and vacuum pumpvalves.
Shut offthe vacuum pump.Wait five minutes tosee
if vacuum holds. This procedurechecks forresidual
moisture and/or leaks.
j. With a vacuum still in the unit, the refrigerant
charge may be drawn into the system from a
refrigerant container on weight scales. The correct
amount of refrigerant may be added by observing
the scales. (Refer to section 6.6)
6.6 REFRIGERANT CHARGE
6.6.1 Checking the Refrigerant Charge
NOTE
To avoid damageto the earth’s ozone layer, use
a refrigerant recovery system whenever
removing refrigerant. When working with
refrigerants you must comply with all l ocal
governmentenvironmental laws. In theU.S.A. ,
refer to EPA section 608.
NOTES
S Set t he controller set point to --25_C(--13_F)
to ensure that the suction modulation valve is
fully open when checking operation of unit.
S The refrigerant level should only be checked
when the unit is running with the suction
modulation valve fully open. The container
temperature should be approximately 1.7_C
(35_F) or --17.8_C(0_F).
a. Connect the gauge manifold to the compressor
discharge and suction service valves.