


8
Program descriptions
1
Basic white
(
3:00 and 2:53)
F
or white and brown bread. Also for flavoured
b
reads with added herbs and raisin.
2
French
(
3:50 and 3:40)
F
or the baking of light weight bread such as french
bread which has a crisper crust and light texture.
3
Wholewheat
(
3:40 and 3:32)
F
or the baking of bread containing significant
a
mounts of wholewheat. This setting has longer
preheat time to allow the grain to soak up the water
a
nd expand. It is not advised to use the delay timer
a
s this can produce poor results. Wholewheat
usually produces a crispy thick crust.
4
Cake
(
1:40)
T
his setting will mix ingredients and then bake for a
p
reset time. It is required to mix two groups of
ingredients in bowls before adding to the
b
readmaker (see cake recipes).
5
Sweet
(
2:55 and 2:50)
For the baking of sweet type bread which gives a
crisper crust than on basic setting. The crisper crust
i
s produced by the sugar ‘burning’.
6 Fastbake I (1:10)
For preparation of a 1.5lb white loaf in a reduced
t
ime period. Loaves made on this setting can be
s
horter and the texture more moist.
7
Fastbake II
(
1:15)
F
or preparation of a 2lb white loaf in a reduced time
p
eriod. Loaves made on this setting can be shorter
and the texture more moist.
8
Dough
(
1:30)
This setting only makes the dough and will not bake
the final bread. Remove the dough and shape it to
make bread rolls, pizza, etc. Any dough can be
prepared on this setting. Do not exceed 1kg (2lb) of
combined ingredients.
9
Jam
(
1:20)
Use this setting for making jam fro
m fresh fruits and
marmalade from Seville oranges. Do not increase
the quantity or allow the recipe to boil over the pan
into the baking chamber. Should this happen, stop
the machine immediately
. Remove the pan carefully,
allow to cool a little and clean thoroughly.
10 Speciality (2:50)
For bread types that are required in a shorter time.
Bread baked on this setting is usually smaller with a
dense texture.
11 Sandwich (3:00 and 2:55)
This is to bake light textur
e br
ead but with a softer
but thicker crust.
12 Extra bake (0:10)
This setting is bake only and can be used to
increase the baking time on selected settings. This
is especially useful to help ‘set’ jams and
marmalade. When started the default time is 10
mins (0:10) minimum and counts down in 1 minute
intervals. You will have to manually switch this of
f
by pressing the stop button, when you have
completed the extrabake process. It is advised that
you check the condition of the br
ead or jam after 10
minutes and at 10 minute intervals.
Pressing
▲ increases the time in increments of 10
minutes up to a maximum 1 hour.
Do not use the extrabake programme for more than
1 hour
, over heating of the pr
oduct may occur
.
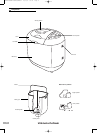
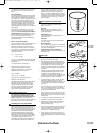
Using your breadmaker
1 Take out the pan
Open the lid and remove the pan by lifting the
handle, turning anti-clockwise and lifting out. Place
on the work surface. It is important that the pan is
filled with ingr
edients outside the machine so that
any accidental spillage is not ignited by the heating
elements.
2 Attach the blade
Attach the kneading blade to the shaft by pushing
on. Ensure the blade is in the upright position
before adding ingredients shown on page 9.
3
Measure ingredients
Measure the ingredients required and add them all
i
nto the pan in the order listed. See later section
(
‘Measuring your ingredients’).
• When adding the yeast to the baking pan, take care
t
hat the yeast does not come into contact with the
w
ater or any other liquid, as it will start to activate
immediately.
•
Use tepid water 21-28ºC.
4
Put pan back in
Place the baking pan back in the breadmaker,
t
urning clockwise to lock into place. Close the lid.
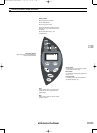
5 Plug in
Plug into the power supply. The breadmaker will
a
utomatically be set to basic bread menu and
n
ormal time.
• Everytime you press a button you will hear a beep
t
o confirm.
6
Select program
Choose the desired setting from the list by pressing
the Menu button.
7 Select weight
Press Loaf size button to choose between small or
large.
8
Select colour
Choose desired crust colour by pressing Colour
b
utton.
9
Select the delay time
If you wish the bread to be ready later, set the time
delay now, as described in next section.
10 Start
Press the Start Stop button to start the machine. The
remaining time will count down in one minute
increments.
11
Pro
gress
T
he breadmaker will automatically proceed through
the pro
grammed stages as shown in the ‘Baking
cycle times’ section. If the breadmaker has a
program selected that has a second kneading
process, beeps sound to inform that fruits and/or
nuts may be added.
• It is possible that steam will escape through the
vents during baking, this is normal.
12 Finish
When the program is completed
and the bread is
baked
the display shows 0:00 and the beeper will
sound.
13 Keep warm
The keep warm function will circulate hot air for a
further 60 minutes on most settings (see ‘Baking
cycle times’ section). For best results, remove the
baking pan and loaf within this period or when the
initial program is completed. 10 beeps will be heard
when the keep warm period is finished.
14 Remove the food
Press Stop. Open the lid.
W
ARNING: Use oven gloves when removing
the baking pan and take care as it is very hot.
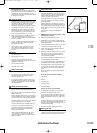
15 Turn out the bread
Allow the bread to cool in the pan for 15 minutes,
then tur
n the pan upside down and tap the br
ead
fr
om the pan onto a rack to cool. Fill the pan with
warm water immediately to prevent the blade from
sticking to the shaft.
• Occasionally the kneading blade will stay in the loaf.
Wait until the loaf is cool and then remove the blade
with a wooden or plastic utensil to avoid damage to
the non-stick surface.
16
Always unplug the appliance after use.
• Do not open the lid whilst the breadmaker is
operating as this will affect the quality of the bread,
especially its ability to rise properly. Only open the
lid when the recipe needs you to add additional
ingredients, see recipes.
BM48268SMEE-SSBreadmaker 27/3/07 09:43 Page 8