11-8 • E2 RX/BX/CX I&O Manual 026-1614 Rev 4 5-JAN-2013
11.3.3.2 Door Switches
Walk-In Box freezers are often equipped with door
switches that disable the evaporators when the door is
open. The E2 is capable of reading a digital door switch
input and controlling the freezer appropriately.
When a door switch opens, the E2 will shut off the
refrigeration solenoid and the fans (if active) and turn the
lights ON.
11.3.4 Fan Control
A circuit’s circulation fan is always ON when the cir-
cuit is in refrigeration mode. Its state during defrost is
determined entirely by how the application is programmed
by the user. You may choose to set the fan either ON or
OFF for each phase of a defrost cycle (Pump Down,
Defrost, and Run Off). If you choose to keep fans off for
the entire defrost cycle, you may also choose to program a
delay that will keep the fan from activating for a fixed
amount of time after the cycle ends.
Fans are locked OFF during clean mode.
11.3.5 The TD3 Temperature
Display
The TD3 is a case display that is designed to monitor
three types of temperature sensors. The compact unit is
mounted on the face of a refrigeration case and displays,
by default, the discharge air temperature. Pressing the
function button repeatedly allows you to view the tem
-
perature of EmersoRetail Solutions’ product probe, the
defrost termination value, and then back to the discharge
air temperature.
The TD3 has a status light that is controlled by the E2
controller. A green status light means that the status is
okay while a red status light indicates alarm.
This case display can be configured to show either the
discharge air temperature (default), the product probe tem
-
perature, or the defrost termination temperature.
The TD3 communicates with the E2 controller via the
Echelon Network and in turn the E2 adjusts the circuit’s
temperature or defrost status.
11.3.6 The Control Link CD Case
Display
The Control Link CD is mounted inside the refrigera-
tion case and serves as a point to which the sensors are
wired. A single RS485 communication cable links the case
display back to the E2 controller. Additionally, an optional
remote display can be added to the control module to pro
-
vide a local indication of case temperature and operational
mode that is remote from the control module.
11.3.7 Wiring
Wiring a case circuit so that it may be controlled by a
Standard Circuit application primarily involves wiring all
temperature sensors to 16AI Analog Input Boards and wir
-
ing the valves and other devices on the case to a relay out-
put board such as an 8RO Relay Output Board.
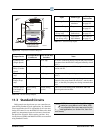
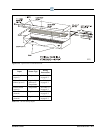
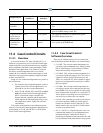
Figure 11-5 shows a typical case in a circuit and the
devices that must be wired for each. Follow the guidelines
below to wire the circuit to the E2 I/O Network:


