


PC Configuration Client PC Setup (Window 98)
INDeX Contact Centre Modules Page 46
Installation & Maintenance 38HBK00001SCM - Issue 11 (05/01)
2. Install the NIC in the PC
To install the NIC in the PC:
1. Make sure that you have run the preinstallation program, as described in the
previous section.
2. Turn off the power to the PC and unplug the power cord.
3. Remove the cover from the PC.
4. Locate an empty, nonshared bus-mastering PCI slot and remove its slot cover.
Save the screw.
Do not install the NIC in a shared PCI slot. Avoid any PCI slot next to an ISA
slot. This is often a shared slot and does not support bus mastering.
5. Carefully insert the NIC in the empty PCI slot. Press firmly to ensure that the
NIC is fully seated in the slot.
6. Secure the NIC with the screw you removed earlier.
7. Replace the PC cover and plug in the power cord.
Do NOT turn on the power to the PC.
3. Connect the NIC to the Network
Connect the appropriate network cable to the NIC provided by the Network
Administrator of the Customer’s Site.
4. Install the Network Driver
To install the network driver:
1. Turn on the power to the PC. Windows 98 detects the NIC.
2. The Add New Hardware Wizard starts, click to select “Display a list of all the
drivers in a specific location” and then click Next.
3. With the Network Adapter selected, click OK.
4. When prompted insert the EtherCD in the CD ROM drive and then click OK.
5. From Insert Disk screen, type the CD ROM drive letter, (e.g. d:\).
6. Click OK and then click Finish.
7. You must restart the PC to complete the installation.
You are now ready to adjust the Networking Setup according to the Customer’s
Network, i.e. either TCPIP or IPX/SPX as detailed in following pages.
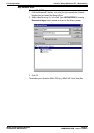
TCP/IP Networking setup
This is only applicable if the site network uses TCP/IP. Otherwise, configure the
network according to the Site's Network.
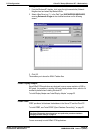
1. From the Windows taskbar, click Start, point to Settings and select Control
Panel.
2. From the Control Panel options open, Network.
3. Highlight TCP/IP Protocol and click Properties. Add the settings specified by
the customer's Network Manager and then click OK.
4. Click OK and allow the Client PC to restart.