


Administering Database Creating Database Backup
INDeX Contact Centre Modules Page 84
Installation & Maintenance 38HBK00001SCM - Issue 11 (05/01)
Backup to a Remote Device
To enable the backing up of a SQL database to a remote backup device residing on
a Windows NT PC the following procedures must be carried out:
On the Source SQL Server PC:
1. Using User Manager, create a New User and grant the newly created User the
rights to log on as a Service;
2. For any NTFS drives that contain SQL files or SQL devices, ensure that the
Newly created user has the right to read, write, execute and delete
3. Configure the MSSQLServer Service.
On the Destination Windows NT PC
1. Using User Manager, create a New User (with the same name as the one on
the Source PC), specifying a password if desired;
2. Configure the Drive/Directory, in which the backup device is to reside, to be
shared;
3. For any NTFS drives that contain SQL files or SQL devices, ensure that the new
user has Full Control Access;
4. Using the SQL Server 7.0 Enterprise Manager, configure the Backup Database
as detailed in “Creating Database Backup” on page 79, ensuring the destination
backup device is set to this PC.
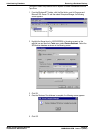
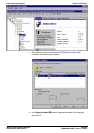
Create a New User
User Manager enables you to manage security for a computer running Windows NT.
With User Manager, you can create and manage user accounts, create and manage
groups and manage the Windows NT's accounts (passwords), user rights and
auditing policies.
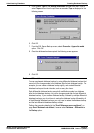
1. From the Windows taskbar, click Start, point to Programs and from
Administrative Tools (Common), select User Manager.
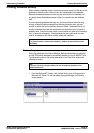
2. From the User menu, select New User, the following screen appears:
3. Type the appropriate information:
–In Username, type a user name;
–In Full Name, type the user's complete name;
–In Description, type a description of the user or the user account;
– In both Password and Confirm Password, type a password of up to 14
characters (if desired);
Note
A user name cannot be identical to any other user or group name of the computer being
administered.
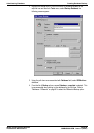
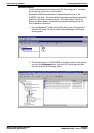
4. Click to clear User Must Change Password at Next Login.
5. Click to select User Cannot Change Password and Password Never Expires.
6. Click Add and then click Close..
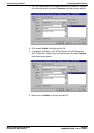
7. From the Policies Menu, select User Rights. Click to select Show Advanced
User Rights.
8. Click OK. From the User menu, select Exit to close the User Manager
application.