137
APPENDIX F — GLOBAL TIME SCHEDULE CONFIGURATION FOR i-Vu
®
DEVICE
AND CSM CONTROLLER
The following is intended to assist a Carrier technician in
configuring a 30XW chiller so either the i-Vu
®
4.0 or 4.2 de-
vice, CCN Global Schedule Master, or a CSM controller can
Start and Stop the chiller. The 30XW chiller has unique table
naming convention for its Time Schedules that are different
than what is used today in CCN. The five steps outlined in the
procedures below must be followed in order to have the i-Vu
device and CCN products control the chiller.
Step 1 — Chiller Configuration
1. Make sure the chiller is shut down and that the Emergen-
cy On/Off Switch (SW2) is in the Off Position and the
Enable-Off-Remote (SW1) is in the Disable position.
2. Next, UPLOAD the chiller to assure the configuration is
current.
NOTE: This must be done in both NSTV and CVIEW.
3. Change the chiller’s Time Schedule Table Name from
OCCyP0xx to OCCPC0xx. See descriptions below.
LOCAL AND NETWORK TIME SCHEDULE
DESCRIPTIONS
OCCPC01S
— The i-Vu 4.2 device will write to this Time
Schedule Table.
OCC2P02S
— This is for Dual Setpoint Control and MUST
be Configured for 24/7 Occupied when the i-Vu device is writ-
ing to OCCPC01S.
OCCPC65E
— Used with the i-Vu device or another CCN
Global Schedule Master with Single Setpoint Control.
OCC2P02E
— This will only be used with Dual Setpoint Con-
trol. This is not applicable in this application.
TIME SCHEDULE TABLE NAME CHANGE
NSTV
— When using NSTV to edit a Time Schedule Name,
the process is the same for both Local (S) or Network (E) Time
Schedules.
1. Highlight the chiller, then (at the top menu bar) click on
Configure Names…
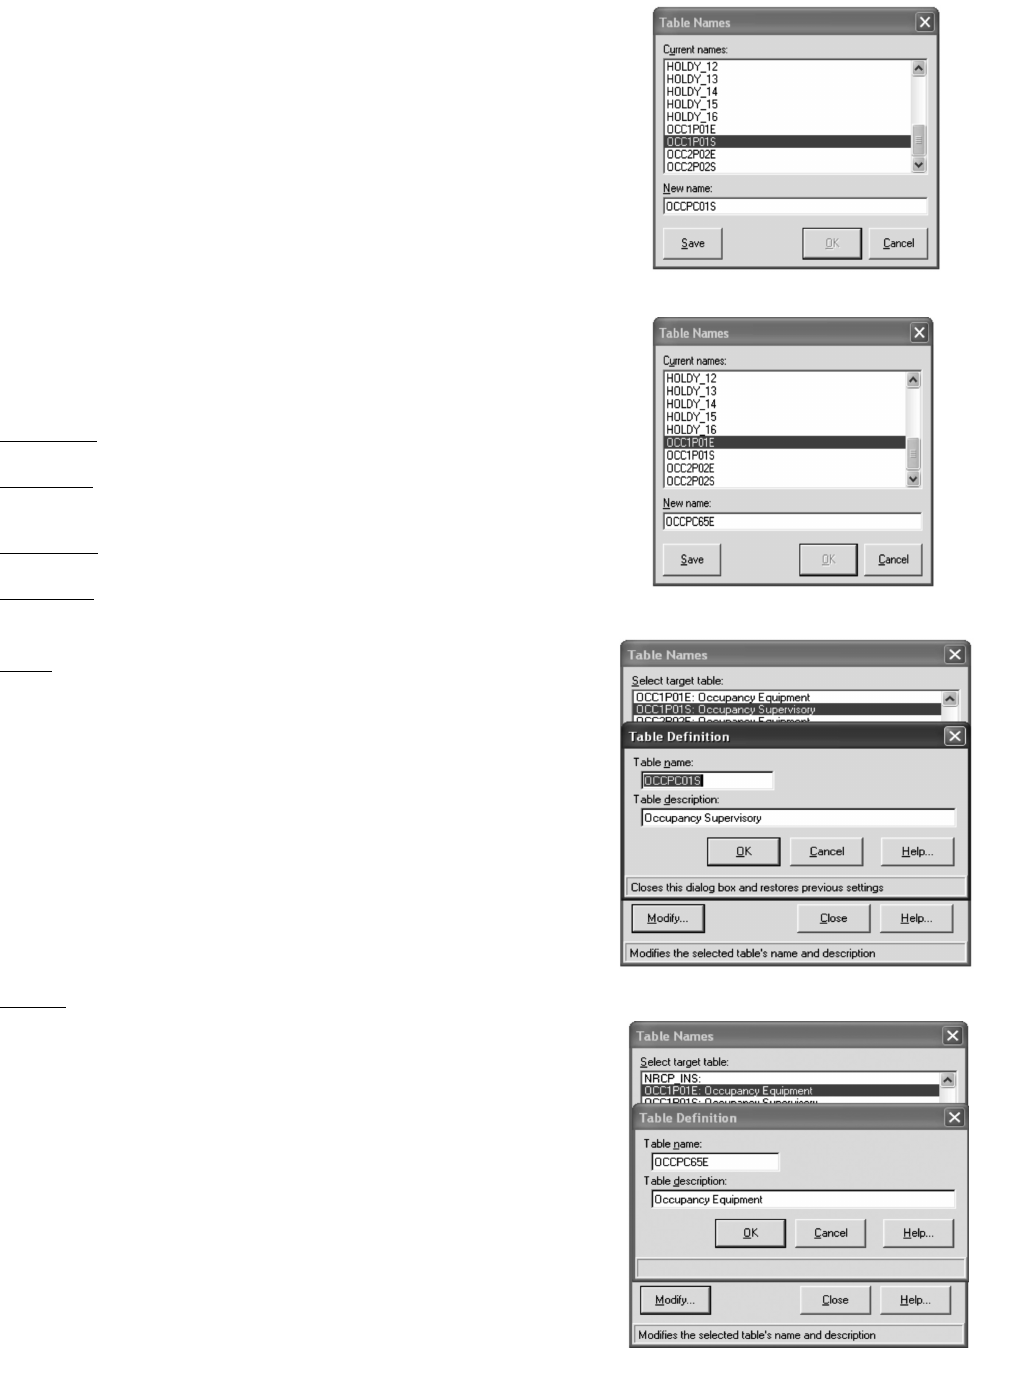
2. When the dialog box opens, scroll down to find the four
time schedules (as seen in Fig. A for Local Schedule or
Fig. B for Network Time Schedule). Highlight the desired
Time Schedule to edit.
3. At the bottom where it says New name, double click on
OCC1P01x and rename it with OCCPC01x click Save
click OK.
4. Download the new configuration to the chiller.
5. Cycle power to the MBB (main base board) using SW2
emergency stop.
CVIEW
— If using CVIEW to edit a Time Schedule Name,
the process is the same for both Local (S) or Network (E) Time
Schedules.
1. Highlight the chiller and click Configure Table Names.
2. When the dialog box opens, scroll down to find the six
OCC tables.
NOTE: Only the "S" and "E" Schedules are editable.
3. Highlight the Time Schedule OCC1P01x then click Mod-
ify…
4. In the new dialog box, rename the schedule OCCPC01x
(as seen in Fig. C for Local Schedule or Fig. D for Net-
work Time Schedule) then click OK to close this dialog
box.
5. Click Close to close the Table Names dialog box.
6. Download the new configuration to the chiller.
7. Cycle power to the MBB (main base board) using SW2
emergency stop.
Fig. A — NTSV Table Name (Local Schedule)
A30-4851
Fig. B — NTSV Table Name (Network Schedule)
30-4852
Fig. C — CVIEW Table Name (Local Schedule)
-4853
Fig. D — CVIEW Table Name (Network Schedule)
0-4854


