170 Chapter 6 Configuration
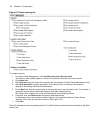
To configure a time off type
1. In YourSite Explorer, in the left pane, click Workforce Scheduling.
2. Click Time off.
3. Click Add.
4. After Name, type the name of the time off type.
5. If employees will be paid for this time off type, under Effects, select the Paid time off check box and
select a color for the time off type.
6. If employees can request this type of time off from Employee Portal, under Effects, select the Can be
requested check box.
7. Under Employment duration qualification, select either the Employed for at least or Employed
no more than check box and specify the number of months.
8. Under Scheduling limitations, select either the You must schedule this type in increments of at
least or You must not schedule this type for more than check box and specify the number of
hours per day/week.
9. If you want to limit the number of hours this time off type can be scheduled, select the Limit the
number of hours that can be scheduled check box.
• If you want to fix the annual amount of this time off type, select Fixed annual amount of and
specify the number of hours.
• If the annual hours of this time off type are accrued, select the Annual hours are accrued
check box and select either Weekly, Biweekly, or Monthly.
• If you want to base this time off type on a percent of the number of hours worked, select Based
on hours worked at a rate of and specify a percent.
• If you want to carry over a fixed amount of accumulated time off hours, select Fixed amount of
accumulated hours up to and specify the number of hours.
• If you want to carry over a percent of accumulated time off hours, select Percent of
accumulated hours, at a rate of and specify a percent.
10. On the ribbon, click Save.
Configuring skills
Employees offer a variety of different skills. For example, some employees might be bilingual or have
certification in a specialty. Using Workforce Scheduling, you can incorporate these skills when you create your
schedules.
Configuring the different types of skills allows you to create and manage schedules that incorporate the skills
and skill levels of your employees. When you create schedules, Workforce Scheduling allows you to schedule
employees with specific skill sets.
NOTE: Skill levels range from 1 to 10, level 10 being the highest skill level, or most skilled, and level 1 being
the lowest skill level. Remember this when you configure employees in YourSite Explorer or on the Contact
Center Management website.
To configure a skill
1. In YourSite Explorer, in the left pane, click Workforce Scheduling.
2. Click Skills.
3. Click Add.
4. After Name, type a name for the skill.
5. On the ribbon, click Save.


