3-19
ISS 506 Integration Seamless Switcher • Operation
N
The User Preset is tailored for the selected output rate. If you change the output
rate and then recall a preset for the earlier rate, the adjustments recalled in the
preset have no effect on the video output. However, if you then change back to
the earlier output rate, the effects of the adjustments appear on the screen if they
were not overwritten for the old output rate.
User presets are recalled using the Input buttons. See “Recalling a user preset”,
later in this chapter.
Erase submenu
Rotate the Adjust [ knob while the Erase submenu is active to select Program or
Preview. Rotate the Adjust { knob to highlight (< >) one of three memory presets
for the selected output or highlight N/A for no preset Press the Next button to
erase the user preset. Highlight N/A and press the Next button to exit without
erasing.
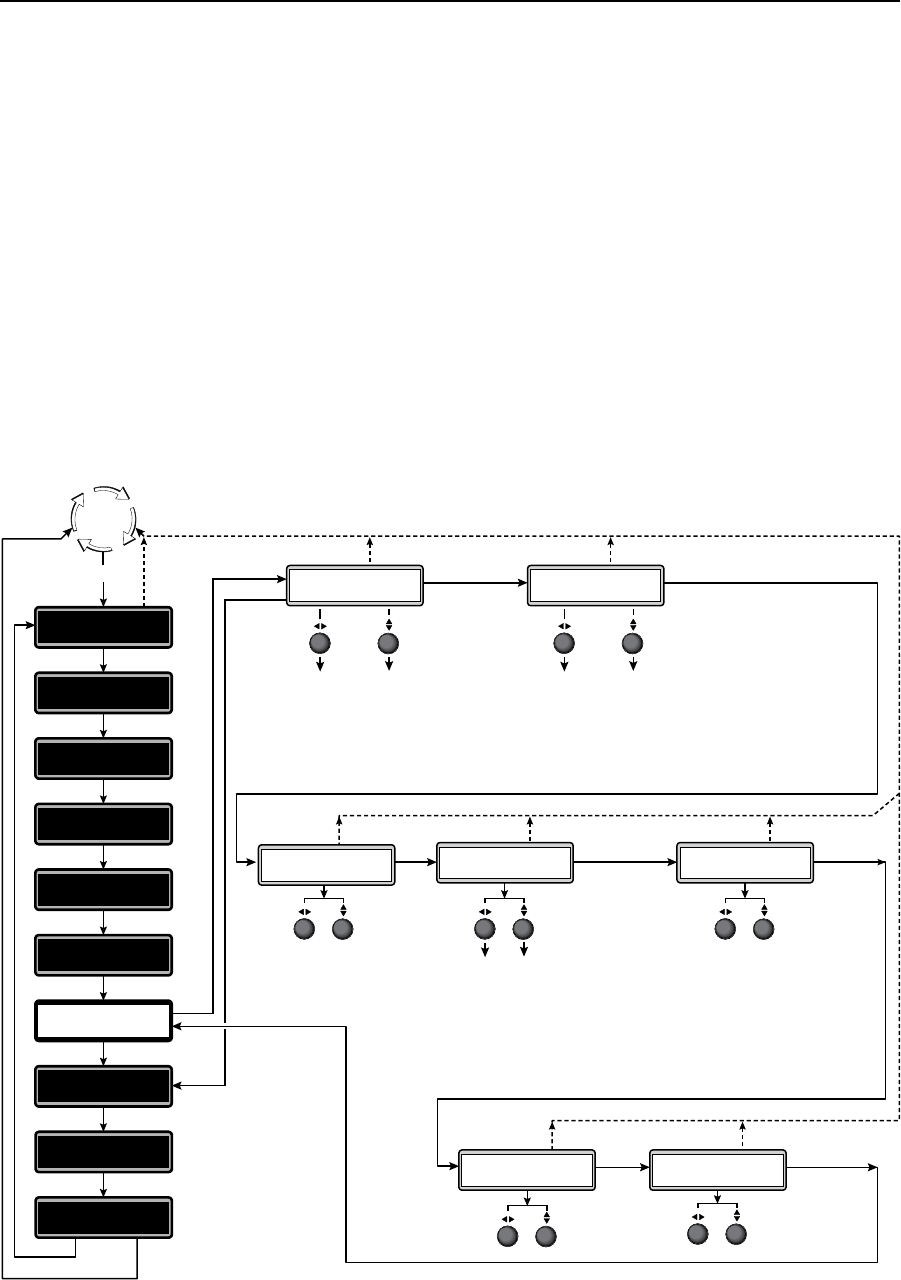
Advanced Configuration menu
Figure 3-13 is a flowchart that shows an overview of the Advanced Configuration
menu, the submenus, and the available settings.
Menu
30 sec.
30 sec.
30 sec. 30 sec.
30 sec.
Next
Next Next
NextNext
NextNext
30 sec. 30 sec.
Next
• Split Color Bars • Crop
• Crosshatch 4:3 • Aspect 1.33
• Crosshatch 4x4 • Aspect 1.78
• Split Gray Scale • Aspect 1.85
• Ramp • Aspect 2.35
• Alternating Pixels
• Off
• Preview
• Program
• Both
Input #1
through
input #6.
0.0 to 5.0 seconds in
0.1-second increments.
Off or On
Default
Cycle
Menu
Menu
Menu
Menu
Next
Menu
Menu
Menu
Menu
Menu
Menu
Menu
Advanced
Configuration
Input
Configuration
Auto
Image
Output
Configuration
Effects
Configuration
Logo
Capture
User
Presets
View Comm
Settings
Scan Converter
Configuration
Exit Menu
Press Next
*
Auto Image
Input#1 Off
Blue Mode
<
Off
>
On
RGB Delay
0.4 Seconds
Reset to Factory
Press Detail
30 sec.
Auto Memories
Off
<
On
>
Preview Switch
<
Swap
>
Stay
Test Pattern Off
Split Color Bars
* This menu is available
only if the optional
scan converter board
is installed.
Values and parameters saved as an Auto Memory:
• Film mode • Total pixels
• Horizontal start • Vertical start
• Horizontal active pixels • Vertical active pixels
• Horizontal size • Vertical size
• Brightness and contrast • Detail
• Horizontal position • Vertical position
• Color • Tint
Figure 3-13 — Advanced Configuration menu flowchart


