


CHAPTER
10-1
Cisco WAN Manager User’s Guide
Version 10.5, Part Number 78-12945-01 Rev. D0, August 2003
10
Network Configurator
This chapter describes the CWM Network Configurator desktop application. The Network Configurator
is a new Java-based application for Release 10 of CWM that enables users to add new nodes, or modify
or delete existing nodes. It is also used to provide descriptor information, node name, and IP address
information for the nodes in your network.
Note Every time a new session of the Network Configurator is started, you must edit the Topod.conf file
located in the /usr/users/svplus/config directory in order to disable automatic unique node ID
generation. The third line of Topod.conf describes the next line as the Auto Node Id Generation flag.
On line four, change the TRUE to FALSE to disable automatic node ID generation.
How to Start the Configurator
The Network Configurator is started by entering runConfigurator <machine name> <login>
<password> on a shell’s command line, where Cisco WAN Manager Release 10 is installed.
The Network Configurator main window appears, allowing the user to add, delete, and modify nodes.
Adding Nodes
To add a new node, complete the following steps:
Step 1 To add a node, select Edit from the main menu bar of the Network Configurator window.
Step 2 Select Node from the Edit menu.
Step 3 Select Add from the Node menu.
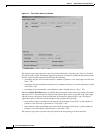
Step 4 A Node Dialog box appears after selecting Add from the Node menu. The Node Dialog box contains
two tab windows, Node and Other Info, in which the user enters information about the new node.
Step 5 In the Node window enter the new node name, the node Descriptor information, and FTP information,
in the appropriate fields.
Step 6 In the Other Info window enter the mode, (Connected or Stand Alone), the MGX Model, the IP Address,
and any Parent Information, including Feeder Slot, Feeder Port, Parent Name, Parent Slot, and Port.
Step 7 Press the OK button in the Node Dialog box.