


Page 192 of
378
Install and configure ITG ISL Trunk node
553-3001-202 Standard 1.00 April 2000
Add an ITG Trunk node on MAT manually
This section uses the MAT 6.6 (or later) ITG ISDN IP Trunk application to
manually add and configure an ITG Trunk node, and add ITG Trunk cards to
the node. A network of multiple ITG Trunk nodes can be configured and
managed from the same MAT PC. Every ITG Trunk node must first be added
manually on the MAT PC, and the MAT ITG Trunk configuration data must
be transmitted to the ITG Trunk node during installation.
After adding a new ITG Trunk node on the MAT PC, the dialing plans for all
existing ITG Trunk nodes must be manually updated to include the
destination node dial plan digits entries for the new ITG Trunk node.
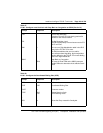
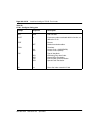
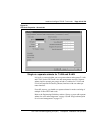
There are several tabs across the top of the ITG Node Properties window. The
following sections describe the windows that appear when you click on each
of these tabs.
Add a node and configure general node properties
Perform the following steps to add a node:
1 Launch the Meridian Administration Tools (MAT) application on the
MAT PC.
2 From the MAT Navigator window, double-click the Services folder and
double-click the ITG ISDN IP Trunks icon. The IP Telephony
Gateway- ISDN IP Trunk Main window opens.
3 Select Configuration | Node | Add in the IP Telephony Gateway -
ISDN IP Trunk Main window. The Add ITG Node window appears.
4 In the Add ITG Node window, leave the default selections Meridian 1
and Define the node configuration manually. Click OK. The Node
Properties General window appears (see Figure 28).
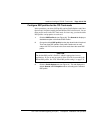
Set node location properties
1 Set Node Location properties: select the MAT site, MAT system,
Customer, and Node number from the drop-down list boxes.
Note:
The Site name, Meridian 1 system name, and Customer must
exist in the MAT Navigator before you can add a new ITG node.