


Page 198 of
378
Install and configure ITG ISL Trunk node
553-3001-202 Standard 1.00 April 2000
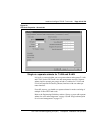
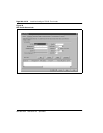
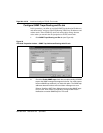
9 Select the Protocol for the DCHIP card from the drop-down list box.
The protocol must match the protocol configured in LD16 in the route
data block at the IFC prompt with respect to SL1 vs. ESGF or ISGF
QSIG interface (IFC) and in LD17 at the IFC prompt under ADAN DCH.
In LD 16, if SIGO is set to STD, then you must select the SL1 protocol.
If SIGO is set to ESN5, then you must select SL1ESN5 protocol. In a
mixed ESN5 and non-ESN5 network, you must configure an ESN5
prefix for the non-ESN5 IP telephony gateways by using the
“esn5PrefixSet” command from the ITG shell CLI. See “Change
default ESN5 prefix for non-ESN5 IP telephony gateways” on
page 223.
The choices are SL1, SL1 ESN5, ESIG and ISIG for networks
consisting of Meridian 1 large systems. For networks that include
Meridian 1 small systems, the choices are SL1 or SL1 ESN5.
In addition to ITG ISL Trunk nodes, the IP telephony trunk network may
contain ITG Trunk 1.0 Basic Trunk nodes or Nortel Networks IP
Telephony Connection Manager. Use H323 V2 node capability for
these nodes.
Once you define a DCHIP for the ITG Trunk node the protocol field is
greyed-out when you select other cards in the same ITG Trunk node.
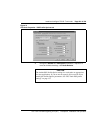
10 Enter the First CHID (Channel ID) for this ISL trunk card in the First
CHID edit box. The First CHID range is:
• 1-259 for the NT0961AA 24-port ITG Trunk card
• 1-375 for the NTCW80 8-port ITG Trunk card
The First CHID is the ISL Channel ID of Unit 0 on this ITG Trunk card,
as configured in LD 14 for the trunk cards and units. Consecutive
CHIDs are assigned to remaining units on the card when configuring
trunks in LD 14 using the NEW xx command.
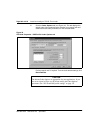
11 Click Add and then click Apply.
Note:
In most cases, you do not click OK until you add all cards to the
node and complete all configuration tasks. If you click OK before you
complete configuration, MAT exits the node property configuration
session and displays the IP Telephony Gateway - ISDN IP Trunk Main
Window. To complete the configuration tasks, double-click on the new
ITG Trunk node in the list in the upper part of the Main Window.
12 Repeat steps 1-10 for Leader 1 and each Follower in the ITG Trunk
node.