


Upgrade an ITG Trunk 1.0 node to support ISDN signaling trunks Page 239 of
378
ITG Trunk 2.0 ISDN Signaling Link (ISL) Description, Installation and Operation
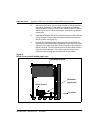
5 Pull the top and bottom locking devices away from the ITG faceplate.
Insert the ITG card into the card slots and carefully push it until it
makes contact with the backplane connector. Hook the locking
devices.
Install the DCHIP I/O Panel breakout cable from the upgrade
kit
The breakout cable provides one D-channel connector.
If you are installing the DCHIP upgrade kit for the NTCW80AA 8-port ITG
Trunk card, use the NTCW84MA I/O Panel breakout cable.
If you are installing the DCHIP upgrade kit for the NTCW80CA 8-port ITG
Trunk card, use the NTCW84LA I/O Panel breakout cable.
1 For the large system, locate the I/O connector that corresponds to the
leftmost card slot of the ITG 8.0 port that is undergoing the hardware
upgrade.
2 Disconnect existing ELAN and serial cables. Remove the existing I/O
panel breakout cable.
3 Install the new cable (NTCW84LA or NTCW84MA). Be sure to use the
screw provided.
4 Reconnect ELAN and serial connectors. For NTCW80CA cards, install
a shielded TLAN cable.
5 Turn to “Install filter and NTND26 cable (for MSDL and DCHIP cards
in same Large System equipment row)” on page 169 to install the
DCHIP connector and MSDL cable.
Upgrade the 8-port ITG basic trunk software to
ITG ISL trunk software
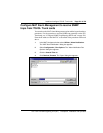
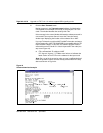
You use the MAT ITG Basic Trunk application to perform this procedure.
Once you have upgraded to MAT 6.6 or later, all the configuration data for
the ITG Trunk node will have been converted.