


Install and configure ITG ISL Trunk node Page 213 of
378
ITG Trunk 2.0 ISDN Signaling Link (ISL) Description, Installation and Operation
7 Repeat steps 7 through 11 until you have added all the ESN translation
Dial Plan digits for this destination node.
8 Click OK.
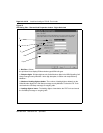
The Dialing Plan window is displayed with the added dialing plan
entries.
9 Repeat steps 2 through 13 until you have added dialing plan entries for
all the destination nodes in the drop down list and all destination nodes
Not Defined on this MAT PC.
Retrieve the ITG Trunk node dialing plan using MAT
If you are adding a new node to a large existing network, it is more efficient
to retrieve the ITG Trunk node dialing plan from an existing node. Make the
necessary modifications before transmitting the dialing plan to the new node.
1 In the IP Telephony Gateway - ISDN IP Trunk Main Window, select an
existing ITG Trunk node which has a dialing plan similar to one you are
creating for the new ITG Trunk node.
2 Make sure that MAT can monitor the card state of Leader 0 in the
existing node from which you are retrieving the dialing plan. Record the
Management IP address of Leader 0 on the existing node.
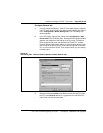
3 Select the new node and double-click to open its Node Properties
sheet.
4 Click the Configuration tab. Record the Management IP address of
Leader 0 on the new node.
5 On the Configuration tab, change the Management IP address of
Leader 0 on the new node. Enter the Management IP address of the
Leader 0 card on the existing node which you recorded in Step 2.
6 Click Change and then click OK.
7 Select the new node in the upper part of the IP Telephony Gateway -
ISDN IP Trunk window.
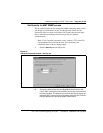
8 Select menu Configuration | Synchronize | Retrieve to open the ITG
Retrieve Options window.