


Maintenance Page 323 of 378
ITG Trunk 2.0 ISDN Signaling Link (ISL) Description, Installation and Operation
11 Select menu
Configuration | Synchronize | Transmit
to transmit the
Node Properties from MAT to the Active Leader card of the ITG node.
Click the “Node Properties” box, and then click “Start Transmit.” This
will update the node properties of the Active Leader card with the MAC
address of the replacement ITG card.
12 Install the replacement ITG card into the Meridian 1:
a Pull the top and bottom locking devices away from the ITG
faceplate.
b Insert the ITG card into the card guides and carefully push it until
it makes contact with the backplane connector. Hook the locking
devices.
Note 1:
When you install ITG cards, the red LED on the faceplate is
lit if: the card has rebooted; the card is active, but there are no trunks
configured on it; or the card is active and has trunks, but the trunks are
disabled. If the LED does not follow the pattern described (for example,
remaining continuously flashing or weakly lit), replace the card.
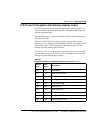
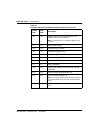
Note 2:
Observe the ITG Faceplate Maintenance display to see
start-up self-test results and status messages. A display of the type
“F:xx” indicates a failure. Some failures indicate that the card must be
replaced. Refer to “ITG Trunk 2.0 faceplate maintenance display
codes” on page 329 for a complete listing of the codes.
13 Attach the T - LAN Ethernet cable to the faceplate of the replacement
ITG card.
Note:
When connecting the ITG card to the T - LAN, the link status
LED on the ITG faceplate associated with the voice interface lights
when the connection is made. The 100 Mbit/s link status LED on the
Ethernet Switch port also turns on when correctly connected to the ITG
card. This indicates that the corresponding port is set to operate at 100
Mbit/s and is the link is good.
14 If the card that is being replaced is an 8-port NTCW80AA and the
replacement card is an 8-port NTCW80CA, the I/O cable must be
replaced:
a Locate the NTCW84LA cable that was included in the 1.0 to 2.0
upgrade kit.
b Remove the NTCW84MA cable from the I/O panel.