


Page 238 of
378
Upgrade an ITG Trunk 1.0 node to support ISDN signaling trunks
553-3001-202 Standard 1.00 April 2000
2 Select the card in which you are going to install the DCHIP hardware
upgrade kit. Disconnect T-LAN cable from faceplate (NTCW80AA
only) and label the cables for reconnection. Remove card from shelf or
cabinet. Place card on a static-safe surface. Avoid touching electronic
components.
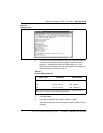
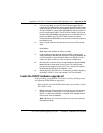
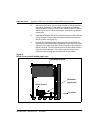
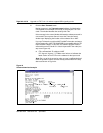
3 Install the NTWE07AA DCHIP PC Card into the internal PC Card slot
on the ITG 8-port Trunk card that has been selected to provide the
DCHIP function (see Figure 43.)
4 Connect the NTCW84EA pigtail cable from port 0 of the DCHIP PC
Card to the J14 pin header on the motherboard of the DCHIP card (see
Figure 43). The cable routes the D-Channel signals to the backplane
and the I/O panel. The PC Card connector is keyed to allow insertion
only in the correct direction. The J14 pin header connector is not
keyed. Be careful to align the connector with the pin header.
Figure 43
DCHIP PC card and NTCW84EA pigtail cable
8 port DaughterBoard
DCHIP PC Card
NTCW84EA
Pigtail Cable
Pin header