


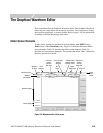

The Graphical Waveform Editor
AWG710&AWG710B Arbitrary Waveform Generator User Manual 3-59
Insert From File...
You can insert another waveform file into the active editor window. The data is
inserted at the active cursor position. Inserting waveform data increases the length
of the whole waveform.
Do the following steps to insert waveform data from a file:
1. Move the active cursor to where you want to insert the file data.
2. Push File (bottom)!Insert from File... (pop–up)!OK (side).
3. Select a file from the Select File dialog box.
4. Push the OK side button.
The data is inserted at the active cursor position.
Close
The Close command closes the active editor window. If you have made edit
changes since the last time you saved your waveform data, and you attempt to close
the editor window, the instrument displays the message Save the changes you
made?. Push the Yes side button to save the waveform data. If you have not made
any edit changes since the last time you saved the file, the instrument closes the
editor window and redraws the screen to display the remaining editor windows. If
you only have one editor window open and close that window, the instrument
returns you to the EDIT main screen.
The Operation Menu
The Operation bottom button provides waveform data edit commands. The
following sections describe each edit command in detail.
If you select a command with an ellipsis (...), the instrument displays either a side
menu or dialog box that lets you set additional parameters. Commands that do not
have ellipses are executed immediately.
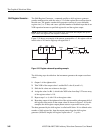
Standard Waveform
This command creates standard waveforms such as sine and triangle waves in the
edit area. The edit area is the area between the cursor positions. Do the following
steps to create a standard waveform:
1. Move the cursors to specify the edit area where the function waveform will be
created.
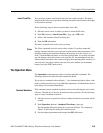
2. Push Operation (bottom)!Standard Waveform... (pop–up).
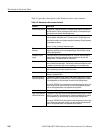
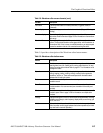
The Set Standard Function dialog box as shown in Figure 3-9 is displayed.
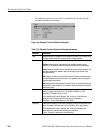
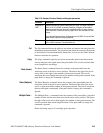
Table 3-10 describes the dialog box field functions.
3. Set the required parameters and the push the OK side button.