


Networking
440 ◆ Features Aspire Software Manual
With ISDN Networking, interconnecting the systems is accomplished by defining a master PCB
and slave PCB between each system (Program 10-03-10 : PCB Setup - Master/Slave System).
Each system must have an ISDN PCB for each other system in the network.
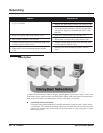
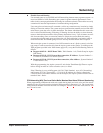
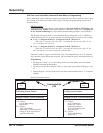
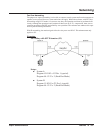
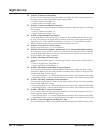
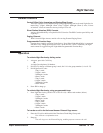
The networked systems can be interconnected using a combination of PRI and VoIP trunks. In this
type of setup, the IP resources will received priority over the PRI resources. The PRI will be used
when the IP resources are busy. The following two graphics indicate correct networking layouts.
Each one provides connection between all three systems within the network.
ISDN Networking Clock Source
When using ISDN Networking (PRI or BRI) on the Aspire system, the option selected in Program
10-03-01 : PCB Setup - ISDN Line Mode determines the clock source for the networked connec-
tion. The following information indicates how, with each option, the clock source is obtained for
the networked systems.
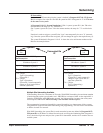
Option 3: Netw
ork Mode (Leased Line)
Telco sends the clock to the Master System
Telco sends the clock to the Slave System
Option 4: Network Mode (Interconnected Line)
Master System sends the clock to the Telco (or direct connection without telco) which then sends
the clock to the Slave System
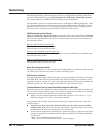
Option 5: (Interconnected Line, Fixed Layer 1=NT)
Master System sends the clock to the Telco
Slave System sends the clock to the Telco
Keep Alive Programs Added
Two options in Program 10-31 for use with the Networking feature are available to define the inter-
val of Keep Alive and how many times the system resends Keep Alive.
PRI Channel Limitation
The system provides an option which can be used to assign the number of B-channels to be used for
each ISDN PCB. This allows for fractional PRIs when used with multiple site networking. If this
program is limited to less than "23" on one side of the network, then it also limits both inbound and
outbound network calls. This also applies on the other side of the network as well.
Transfer Network Trunk to Local Voice Mail Using Voice Mail Key
With older software, IP or PRI network sites that had their own voice mail could not transfer a call
into voice mail using the following steps if the inbound call originated in another site (for example,
a call comes in to Site A and it translates to an extension at Site B):
● HOLD + the Voice Mail Programmable Function Key (Program 15-07 or SC 851 + 77) or
MSG key (Program 15-02-26=1) + the extension number.
Using software 3.05 or higher, this operation is now possible. Keep the following in mind when
using this option:
● Note that if you have a local and central voice mail, you can not have the same mailbox
number at each node. If both sites have the same mailbox, when transferring a call, it will be
transferred into the local voice mail and not across the network.
● As this software change allows transferring to a general message by a Single Line Set, the fol-
lowing two operations have different results between Networking Call Transfer and Internal
Call Transfer.
- Hold + Voice Mail Master Dial then hang up.
- Hold + Service Code (Own Mailbox Access - *8) then hang up.