VoIP
Aspire Software Manual Features ◆ 653
Programming - H.323 Phone, Static IP Address
Setting the IP Address on the ITR-2D-1 IP Phone Using a Static IP Address
1. Press the menu key.
The Setup Menu screen will be displayed with Call Logs as the first entry.
2. Go to the Configuration sub menu using the ▲ key.
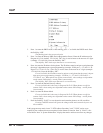
3. Press the Select key. The Configuration Menu screen will be displayed showing the first entry
of Configuration Menu, which is Phone Configuration. Using the ▲ key go to the “Network
Menu” which is the second entry under the Configuration Menu.
4. Press the Select key. The display prompts you to enter the password. Enter the password and
press the Select key. The default administrator’s password is 654321.
If a wrong password is entered, the display indicates “Incorrect Password” and Step 4
can be repeated.
5. If a correct password is entered, the current DHCP setting (Enabled or Disabled) will be dis-
played on the LCD as the first setting of the Network Configuration. There are 6 network
related settings available under Network Configuration.
6. Press the Select key (
▲ and ▼ keys can be used to move within the screen or to go to any one
of the 6 network related settings).
7. This screen allows you to either enable or disable the DHCP. Use ▲ and ▼ keys to select dis-
abled then press the Select key.
To cancel instead, press the Cancel/Del key repeatedly until returning to standby mode
or press the Menu key once to go to the standby mode.
8. The phone needs be restarted for the new settings to take effect. Press Select key to restart the
phone, press Del/Cancel to return to the previous menu or Menu to return to standby mode
without restarting the phone. If the Line 1, Line 2 or SPK/HS key is pressed or the handset is
picked up, the phone will go off and the restart will be cancelled. If the phone restart is can-
celled, the changed network setting will not be used until the phone is restarted. If the Select
key is pressed, “Initializing…\” will be displayed while the phone is resetting.
If there is an error in saving, “Cannot Save” will be displayed for 1 second.
9. Repeat Steps 1-6.
10. Use the ▲ and ▼ keys to move to “IP Address.”
11. Press the Select key to see the current terminal IP address. A screen will be displayed prompt-
ing user to change the value.
Press the Cancel/Del key to go the previous screen.
This menu is used to read or change the current value of the terminal IP address if DHCP
assignment is disabled. The format of the IP address is: xxx.xxx.xxx.xxx (use the * key to enter
the decimal between the numbers). Allowed entries for each set of three numbers are 0-255.
12. Press the Select key to change the IP address. Enter the correct IP address and press the Select key.
For on-site LANs, the IP address must be unique to each phone but the range is depen-
dent upon system programming (example: IP Phone 1 = 172.16.0.11, IP Phone 2 =
172.16.0.12, etc.). When phones are off-site (remote LAN) , these settings are dependant
on the remote LAN settings - not the phone system settings.
If the entered IP address is not valid, “Invalid Input” will be displayed for 1 second
before returning to the “IP Address” screen.
Press the Cancel/Del key to return to the previous screen without making any changes.


