


VoIP
658 ◆ Features Aspire Software Manual
9. Repeat Steps 1-6.
10. Use the ▲ and ▼ keys to move to “IP Address.”
11. Press the Select key to see the current terminal IP address.
With DHCP enabled, the IP address, subnet mask, default gateway will be read only
and user cannot change the address.
12. Use the ▲ and ▼ keys to move to VLAN Enable/Disable. Press the Select key.
13. Use the ▲ and ▼ keys to change the selection and press the Select key.
Press the Cancel/Del key to return to the previous screen without making any changes.
14. The phone needs be restarted for the new settings to take effect. Press Select key to restart the
phone, press Del/Cancel to return to the previous menu or Menu to return to standby mode
without restarting the phone.
If there is an error in saving, “Cannot Save” will be displayed for 1 second.
15. Repeat Steps 1-6.
16. Use the
▲ and ▼ keys to move to VLAN ID.
17. Press the Select key to read the value. The next screen displayed prompts you to change the
value if needed.
18. Press the Select key to change the VLAN ID. Enter the correct VLAN ID and press the Select
key.
The valid range of entries is 0-65535.
Press the Cancel/Del key to delete a digit of the existing VLAN ID. If no ID number is
displayed when the Cancel/Del key is pressed, it will return to the previous screen.
19. The phone needs be restarted for the new settings to take effect. Press Select key to restart the
phone, press Del/Cancel to return to the previous menu or Menu to return to standby mode
without restarting the phone. If the Line 1, Line 2 or SPK/HS key is pressed or the handset is
picked up, the phone will go off and the restart will be cancelled. If the phone restart is can-
celled, the changed network setting will not be used until the phone is restarted. If the Select
key is pressed, “Initializing…\” will be displayed while the phone is resetting.
If DHCP is enabled and after restarting the phone, if the phone cannot find the DHCP
server or it fails to retrieve the network information, the phone will go to the standby
mode.
If there is an error in saving, “Cannot Save” will be displayed for 1 second.
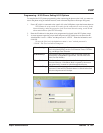
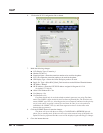
Programming - Using an External DHCP
Note 1. If a user’s LAN is already operating with a DHCP server, disable the Aspire’s DHCP
server. Either DHCP server can be used, but not both.
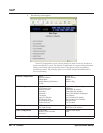
Note 2. When an external DHCP server is operating, make sure to define Program 10-16.
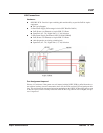
➻ 10-13-01 : In-DHCP Server Setup - DHCP Server Mode
Enable (1) the system’s ability to use the built-in DHCP server. The system must be reset in
order for the change to take effect.
➻ 10-16-01 : Option Information Setup - Router
Set the router address for the DHCP server to the client.
➻ 10-16-02 : Option Information Setup - DNS Server
If required, set the DNS server address for the DHCP server to the client.
➻ 10-16-03 : Option Information Setup - TFTP Server
Set the TFTP server address for the DHCP server to the client.