


VoIP
Aspire Software Manual Features ◆ 659
➻ 10-16-04 : Option Information Setup - DRS
Set the NTCPU’s IP address for the DHCP server to the client.
➻ 84-04-01 : VOIPU PCB DHCP Server Mode Setup
Enable (1) the use of DHCP for the VOIPU PCB.
➻ 84-05-01 : VOIPU IP Address Setup - IP Address
For each VOIPU PCB, enter the IP address for the VOIPU PCB (default: slot 1=172.16.0.20,
slot 2 = 172.16.0.21, etc.). The IP address should be increased according to the number of
VOIPU PCBs. This entry becomes invalid if Program 84-04 is set to 1 (DHCP enabled).
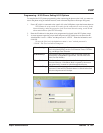
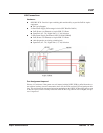
Programming, Aspire IP Keyset or Aspire Keyset with IP Adapter - DHCP
Setting the IP Ad
dress on an Aspire IP or Aspire Keyset with IP Adapter Using a
DHCP Server
1. On the Aspire IP keyset, enter the phone’s program mode by pressing HOLD CONF * #.
This enters the IP User Menu program mode to select the settings for the individual
phone.
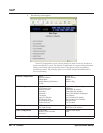
2. Press 1 to enter the DHCP mode. If not flashing, press "2" to enable the DHCP mode. Press
the Soft Key “OK”.
The flashing item is the current selection.
3. The entries for items 2, 4, 5, and 6 are automatically set by the DCHP server.
4. Press the Soft Key “SAVE” to save the entries and return the phone to an idle condition.
In this program entry mode, items "3. DTS Address Secondary" and "7. DNS" can be set as
required by the customer but are not required for the feature to function. Item "8. VLAN" is dis-
cussed below. Item "9. System Information" displays the entries and does not allow any changes.
Programming - H.323 Phone, Enabling DHCP
Setting the IP Address on the ITR-2D-1 IP Phone Using a DHCP Server
1. Press the menu key.
The Setup Menu screen will be displayed with Call Logs as the first entry.
2. Go to the Configuration sub menu using the ▲ key.
3. Press the Select key. The Configuration Menu screen will be displayed showing the first entry
of Configuration Menu, which is Phone Configuration. Using the ▲ key go to the “Network
Menu” which is the second entry under the Configuration Menu.
4. Press the Select key. The display prompts you to enter the password. Enter the password and
press the Select key. The default administrator’s password is 654321.
If a wrong password is entered, the display indicates “Incorrect Password” and Step 4
can be repeated.
5. If a correct password is entered, the current DHCP setting (Enabled or Disabled) will be dis-
played on the LCD as the first setting of the Network Configuration. There are 6 network
related settings available under Network Configuration.
6. Press the Select key (▲ and ▼ keys can be used to move within the screen or to go to any one
of the 6 network related settings).
7. This screen allows you to either enable or disable the DHCP. Use ▲ and ▼ keys to select
Enabled then press the Select key.
To cancel instead, press the Cancel/Del key repeatedly until returning to standby mode
or press the Menu key once to go to the standby mode.